Agricultural Sciences
Vol.12 No.03(2021), Article ID:107626,22 pages
10.4236/as.2021.123011
Testing an Open-Source Multi Brand Sensor Node to Monitor Variability of Environmental Conditions inside a Greenhouse
Reginald S. Fletcher1, Daniel K. Fisher2
1United States Department of Agriculture, Agricultural Research Service, Crop Production Systems Research Unit, Stoneville, USA
2Sustainable Water Management Research Unit, Stoneville, USA

Copyright © 2021 by author(s) and Scientific Research Publishing Inc.
This work is licensed under the Creative Commons Attribution International License (CC BY 4.0).
http://creativecommons.org/licenses/by/4.0/


Received: September 26, 2020; Accepted: March 6, 2021; Published: March 9, 2021
ABSTRACT
A research project was undertaken to collect data to study the variability in environmental parameters inside a greenhouse. The specific objectives of the project were to 1) develop the network of open-source sensor nodes, 2) evaluate the performance of the individual sensors, and 3) quantify the spatial variability of environmental parameters within the greenhouse. The sensor system consisted of a sensor node equipped with three temperature and relative humidity sensors, one light-level sensor, one barometric pressure sensor, AA batteries, and a microcontroller board with a built-in radio to transfer the data wirelessly. The sensors were controlled with open-source technology. Twelve sensor nodes were fabricated and placed at different locations in a greenhouse to evaluate variability in sensor location and environmental parameters. Data collected during February 2019 were used to test the sensors. Heatmaps were employed to assess the variability of the measurements. Variability in greenhouse temperature, relative humidity, and light level conditions was identified with the sensor system. Overall, environmental measures based on time of day appeared to be a better grouping mechanism for analysis than sensor location in the greenhouse. Similar patterns were observed between the different sensor manufacturer’s heatmaps for the temperature sensors and relative humidity sensors. This study provided a protocol for developing the inexpensive multi-sensor sensor node and showed that automated measurements obtained with the system could help monitor variation in a greenhouse setting. The costs of the system components fabricated for this study included US$76 for each sensor node and US$55 for the gateway, totaling US$967 for the 12-node study described.
Keywords:
Arduino, Microcontroller, LoRa Radio, Temperature, Humidity, Light Level, Clustering, Heatmaps

1. Introduction
Miniature sensing technologies for agricultural applications are growing at a rapid pace. Sensors have been employed in precision agriculture [1], monitoring greenhouse environmental conditions [2] [3] [4], and checking soil moisture [5] [6]. Users of these technologies are interested in employing open-source tools to control the sensors because scripts created with open-source technologies can be shared and modified by other users. Also, open-source software is free or less expensive than commercial software, thus providing cost savings to the user.
Numerous sensor brands are available commercially for monitoring environmental conditions in agricultural settings. Users are often interested in testing more than one sensor brand to determine how they compare and work with other sensor brands. Miniature sensors combined with open-source technologies provide opportunities for users to build inexpensive combination sensors to compare environmental sensors, and this study demonstrates using these technologies inside a greenhouse to evaluate the variability of environmental parameters, which play a role in greenhouse management. Environmental parameters, including air temperature, relative humidity, barometric pressure, and light levels, were measured continuously at various locations within the greenhouse via a network of microcontroller-based sensor nodes. The specific objectives of the project were to 1) develop the network of open-source sensor nodes, 2) evaluate the performance of the individual sensors, and 3) quantify the spatial variability of environmental parameters within the greenhouse.
2. Materials and Methods
2.1. Network of Sensor Nodes
The open-source wireless monitoring system consists of sensor nodes that collect and transmit data from individual sensors and a gateway that receives and stores the sensor data from each node. The nodes and gateway consist of hardware components, including programmable microcontrollers, radios, and electronic sensors and auxiliary peripherals, and a software component consisting of microcontroller programs written to provide measurement and control functions.
2.1.1. Sensor Node Hardware
Each sensor node consists of an electrical circuit that interfaces several environmental sensors with a programmable microcontroller development board. The microcontroller development board, Moteino (LowPowerLab, https://LowPowerLab.com), features an Atmel ATmega328P 8-bit microcontroller and auxiliary electronic components, and a built-in radio transceiver. The microcontroller provides digital and analog input/output pins, 10-bit analog-to-digital converters (ADCs), and support for serial, I2C (Inter Integrated Circuit), and SPI (Serial Peripheral Interface) communications. The Moteino uses the same microcontroller as that in the Arduino open-source microcontroller project and is programmed using the Arduino’s Integrated Development Environment (IDE) (https://www.arduino.cc).
The Moteino development board is available with several optional, built-in radios that operate in the license-free Industrial, Scientific, and Medical (ISM) radio bands. For this greenhouse monitoring project, a 915 MHz LoRa (Long Range) radio, designed for long-range, low data-rate data transmission with low power consumption, was selected. The LoRa radio interfaces with the microcontroller via the SPI protocol and uses a length of simple solid-core wire as an antenna.
Three temperature and relative humidity sensors and one light-level sensor were selected to evaluate the spatial variability of environmental conditions inside the greenhouse. The multiple temperature and humidity sensors, which employed differing sensing technologies, also allowed the variability/repeatability of measurements made with the different technologies to be evaluated. The four different sensor types are available in the form of breakout boards, with the raw sensors and auxiliary electronic components mounted on a single circuit board. Breakout boards offer convenient access to electronic sensors, which are often small and difficult to handle. They also provide components necessary for the proper regulation of circuit voltage and digital signal levels, easing access for research and prototype development.
The four sensors communicate via the two-wire I2C protocol, a common and popular standard for interfacing digital sensors and microcontrollers (https://i2c.info). The I2C protocol uses two microcontroller pins, referred to as DATA and CLOCK, to connect to and communicate with an I2C-based sensor or other device. Each device type has a unique I2C address that allows the microcontroller to specify a particular device and send commands to that device. This setup allows multiple devices to use the same two microcontroller pins, which simplifies the design of project circuit boards and provides for smaller microcontrollers with fewer input/output pins to be used. To make measurements with an I2C sensor, the microcontroller specifies the sensor via the sensor’s unique I2C address and sends commands. The sensor responds to the commands, makes appropriate measurements, stores the measurements internally, and the microcontroller then retrieves the stored measurements from the sensor.
The temperature and relative humidity sensors were selected from three different manufacturers and included the BME280, SHT31D, and Si7021 sensors. The BME280 Temperature, Humidity, and Pressure Sensor (Bosch Sensortec GmBH, Reutlingen, Germany; https://www.bosch-sensortec.com) was purchased in the form of the BME280 Temperature, Relative Humidity, and Pressure WeatherShield (LowPowerLab). In addition to temperature (T) and relative humidity (RH), the BME280 also provides a measurement of barometric pressure (P). The WeatherShield is a breakout board designed to mate directly with the Moteino microcontroller development board, requiring no additional circuitry to interface the microcontroller and sensor. The SHT31D Temperature and Relative Humidity Sensor (Sensirion, Staefa, Switzerland; https://www.sensirion.com/en/) and the Si7021 Temperature and Relative Humidity Sensor (Silicon Labs, Austin, TX USA; https://www.siliconlabs.com) were purchased in the form of breakout boards (Adafruit Industries, New York, NY USA; https://adafruit.com) and provide measurements of temperature and relative humidity only.
The TSL2591 Light-to-Digital Converter (ams AG, Premstaetten, Austria; https://ams.com) allows the user to collect five different measurements; lux, visible light level, infrared light level, full spectrum light level (visible and infrared light), and raw luminosity. For this study, the sensor was programmed to measure the lux (L), the infrared light level (IR), and the full spectrum light level (FS). Information about the sensors, including mechanical, electrical, and performance specifications, are detailed in the respective manufacturer’s datasheets [7] [8] [9] [10], with performance specifications pertinent to the greenhouse experiment listed in Table 1.
A battery-powered electrical circuit for the sensor node was developed to integrate the microcontroller and sensors and enable sensor measurements. The circuit’s electrical schematic, shown in Figure 1(a), was then used to lay out and fabricate a circuit board for the sensor nodes, shown in Figure 1(b). The circuit board was constructed on a small protoboard (Part Number 21-4600, Newark element 14, https://www.newark.com) by first soldering female and male headers (Adafruit Industries) to the protoboard and male headers to the Moteino board. Resistors and jumper wires were added to make physical connections between appropriate microcontroller and sensor pins according to the schematic. An assembled sensor node, with microcontroller and sensors installed, is shown in Figure 2. A list of materials and approximate costs of the components is provided in Table 1.
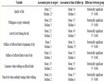
Table 1. List of materials for monitoring system sensor node.
 (a)
(a)
 (b)
(b)
Figure 1. Sensor node (a) electrical schematic and (b) prototype board.

Figure 2. Assembled sensor node.
2.1.2. Gateway
The gateway is based on a microcontroller development board similar to that used in the sensor node, with a programmable microcontroller and LoRa radio constructed on a single circuit board. The Feather M0 microcontroller board (Adafruit Industries) consists of a 32-bit microcontroller with analog and digital input/output and communications features. The same 915 MHz LoRa radio transceiver as that on the sensor node’s Moteino development board. The Feather M0 board was selected for the receiver based on its additional program storage and execution memory, required for programming to accomplish data-reception, sorting, and storage of data from multiple sensor nodes. The Feather M0 microcontroller is also compatible with and programmed using the Arduino IDE.
The Adalogger Featherwing (Adafruit Industries) is an auxilliary circuit board designed to mate directly with the Feather M0 development board and provide additional features. The Adalogger Featherwing contains a PCF8523 Real-Time Clock/Calendar (NXP Semiconductors N.V., Eindhoven, Netherlands) and microSD circuit and cardholder, which provide date and time information and sensor-data storage capabilities. The real-time clock communicates with the microcontroller via the I2C protocol, while the microSD circuit communicates via SPI. The real-time clock circuit includes a backup battery for uninterrupted timekeeping.
The gateway circuit is powered by either a rechargeable 3.7 VDC battery or a 120/240 VAC to 5 VDC transformer. Since the gateway is assembled from physically mating components, no additional electronic circuitry was required. The Feather M0 and Feather Adalogger boards simply plugged together, and the insertion of the power source completed assembly of the gateway. The assembled gateway is shown in Figure 3, with a list of materials and approximate costs provided in Table 2.
2.2. Software
2.2.1. Microcontroller Programming
Programming of the microcontrollers for the sensor node and cellular gateway was accomplished using the Arduino IDE, version 1.8.5, which was downloaded from the Arduino project website (https://www.arduino.cc) and installed on a personal computer. The Arduino IDE enables the user to develop, debug, and upload microcontroller programs based on C/C++. Two programs were written, one to control the sensor node and one for the gateway. The scripts described below are open-source and freely available by contacting the authors.

Figure 3. Gateway components.
Table 2. List of materials for gateway.
The sensor node program consists of subroutines to configure the microcontroller, and other hardware components, acquire sensor measurements, and transmit sensor data via radio to the gateway.
Program execution begins by importing several external programming libraries, which contain program instructions for performing various hardware functions. Microcontroller input/output pins used in the circuit are specified and program variables are declared. Communications protocols used to communicate with the sensors and radio, including SPI and I2C protocols, are configured and initiated. The program then enters the main routine, which runs continuously while the circuit is powered. The main routine begins by calling separate subroutines that read the three sensors.
Following sensor measurements, the microcontroller turns the RFM95 LoRa radio on and prepares for data transmission. A data packet is assembled consisting of 12 data values; the node ID number, BME280 T, RH, P, SHT31D T, RH, Si7021 T, RH, and TSL2591 L, IR, FS sensor values, and node battery voltage. The sensor node circuit has no clock and cannot synchronize the timing of data transmissions with the gateway. To ensure that node data are received by the gateway, the node radio transmits data at 60-second intervals, sending data packets three times with random time intervals between transmissions to account for possible collisions between transmission from multiple nodes. At one-hour intervals, the gateway radio turns on and remains on to accept node transmissions for 65 seconds. Sensor-node data transmissions occurring when the gateway radio is not on are simply transmitted but not received. The data packet is then transmitted, and the microcontroller turns off power to the sensors and radio and enters a low-power sleep mode to minimize current draw and prolong the life of the batteries.
The microcontroller program for the gateway is similar to that of the sensor node, consisting of subroutines to manage configuration, timekeeping, and data reception and storage operations. One difference in the operation of the gateway circuit compared to that of the sensor node relates to the timing of circuit operation. The gateway circuit includes a real-time clock, which is used to determine when the circuit becomes active, and node data are received.
Following the initial powering and configuration routines of the gateway circuit, the program enters the main routine. The routine begins by first reading the RTC to obtain the current time and determine if it is time to collect node data. The circuit is programmed for a one-hour measurement interval: if the measurement interval has not been reached, the circuit returns to a low-power sleep mode for one minute, after which the clock is read again.
If a measurement period is signaled, the microcontroller powers the circuit and begins the data collection and storage process. The microcontroller turns on the LoRa radio for a period of 65 seconds, receives any incoming radio transmissions, and then turns the radio off. Data packets received are sorted, and duplicate packets from each node are discarded. Node data, along with the current date and time, are stored on a microSD card. The microcontroller then turns off power to the circuit components and enters a low-power sleep mode. The microcontroller wakes at one-minute intervals, reads the real-time clock, and returns to the sleep mode until the next measurement interval occurs.
2.2.2. Initial Sensor Testing
The monitoring system was installed in a greenhouse at the United States Department of Agriculture, Agricultural Research Service’s Jamie Whitten Delta States Research Center at Stoneville, MS, USA and operated during the 2019 cropping season. The climate conditions of this area are as follows: 1) highest and lowest temperatures occur in August (33.2˚C) and January (0.7˚C), respectively, 2) it rains approximately 100 days a year; the yearly rainfall is 134.4 cm, 3) snowfall is approximately 1.3 cm, and 4) sunny conditions occur 215 days a year.
Before deploying the monitoring system and beginning the environmental variability test, an initial intercomparison of the sensors was undertaken to evaluate the response and quantify and calibrate out any bias between the different sensor technologies and individual sensors. Since the study’s objective was to assess variabilities within the greenhouse, the first step was to eliminate any sensors’ variabilities.
The twelve sensor nodes were initially placed in a random arrangement in the center of the empty greenhouse close to each other to expose them to the same environmental conditions. Hourly sensor measurements were made and recorded for approximately one week. The sensors were then rearranged randomly, and the process was repeated and was then repeated a third time.
Measurements from each of the twelve sensor nodes for each sensor type, and for each environmental parameter measured by that sensor type, were correlated to quantify the bias of each sensor’s measurements. For each sensor type and environmental parameter, the mean of all sensor measurements at each measurement interval was calculated. The bias of each sensor’s measurements from that mean value was calculated and used to determine an offset value for each sensor, which could be applied to correct each measurement to indicate that mean value. Individual offset values for each sensor parameter for each of the twelve sensor nodes were determined to reduce each sensor’s measurement error within two percent of the mean values.
2.3. Experimental Greenhouse Setup
For the experiment, twelve sensors were placed in a greenhouse constructed of polycarbonate material. Its dimensions were approximately 9.5 m by 7.6 m. The greenhouse contained four rolling workbenches made of metal, and the bench top was a metal mesh frame. On each workbench, three sensors were placed to obtain measurements. Sensor placement was at the West end, center, and East end of the workbench (Figure 4). The greenhouse’s climate was maintained with a climate control system.

Figure 4. Sensor arrangement in greenhouse.
2.4. Post Processing of the Data
For sensor results reported in this paper, data were extracted from the sensor database at one-hour time intervals (i.e., 0000, 0100, 0200, ···2300 hrs). Evaluation of the data indicated that the most consecutive days (20 days) of data collection occurred in February 2019 (February 5-24). Thus, data collected during February 2019 were used for further analysis. Plants were growing in the greenhouse during the month of February; however, they were placed in areas that did not affect the sensor readings.
The temperatures from the BME280, SHT31D, and Si702 sensors were recorded in degrees Fahrenheit. The values were converted into degrees Celsius prior to further analysis. The relative humidity and atmospheric pressure data were measured in percent and hectopascals (hPa), respectively. The lux and infrared readings are a 16-bit unsigned value with no units; the full spectrum measurements are a 32-bit value with no units. The higher the values, the greater the light intensity.
The temperature, relative humidity, barometric pressure, and light sensors database were created from measurements collected at one-hour intervals. However, at times no information was recorded, resulting in a missing value for the sensor at the specified time. Also, the light sensors had a few negative readings which were not appropriate for analysis. Those values were removed from the dataset. Missing data and negative values were imputed using the Multivariate Imputation by Chained Equations with Random Forest algorithm (miceRanger). It uses an iterative system of prediction models to impute missing data values [11]. The miceRanger [11] package of the R software [12] was used to complete the imputation.
For each sensor, twenty-four measurements were recorded daily based on the hourly measurements. The measurements are referred to as T and a number for the remainder of the manuscript. For example, T0 represents the environmental measurement acquired at 0000 hrs. The final dataset consisted of an average of the readings per time over the 20-day period. The light intensity readings values were negative at night and before sunrise, thus, the light readings data set only consisted of measurement T7 - T19. The sensor location (S1) and the environmental variable represented the rows and the columns, respectively of final database.
2.5. Data Evaluation
Heatmaps [13] were created to understand the clustering aspects of the sensor locations and environmental measurements based on time of day and to compare patterns between sensors. Prior to developing the heatmaps, the cluster tendency of the data along the row (sensor location) and down the column (environmental measurement) were verified using the Visual Assessment of cluster Tendency (VAT) technique [14] and the Hopkins statistics [15]. VAT involves creating an ordered dissimilarity matrix of the dataset objects based on the Euclidean distance measure. Then the objects are reordered so that similar objects are placed close to each other, resulting in an ordered dissimilarity matrix. The matrix is displayed as an image. Dark boxes represent meaningful and well separated clusters along the diagonal of the image. The algorithm used to calculate the Hopkins statistics for this study indicates that values less than 0.50 signify a good clustering tendency of the data [15]. VAT, Hopkins statistic, and heatmap development were completed with the factoextra [16], parameters [17], and Complex HeatMap [18] packages of R software. The datasets were not normalized before any analyses because the information for each sensor dataset was on the same scale. If the sensor location (row data) or environmental variable (column) met the criteria of the VAT and Hopkins statistic, then the object order in the heatmap was clustered using agglomerative hierarchical clustering. The distance measure and linkage method used for the agglomerative hierarchical clustering were Euclidean distance and complete linkage, respectively.
3. Results
3.1. Clustering Tendency
The clustering tendency results indicated that the sensor location and environmental measurements collected hourly were suitable for clustering (Table 3, Figures 5-8). Dark boxes were present along the diagonals in the VAT images (Figures 5-8), and the Hopkins statistics values were less than 0.50 (Table 3). Environmental condition time measurements cluster tendency was more robust than the sensor location clustering tendencies. The sensor location cluster tendency appears to be more compact than the environmental condition measurements clustering tendencies (Figures 5-8). Similar patterns were observed in the cluster tendencies of the temperature sensors’ and the relative humidity sensors’

Figure 5. Visual Assessment of Cluster Tendency for the temperature sensors: (a) BME280—sensor location, (b) BME280 temperature—time of day, (c) SHT31D—sensor location, (d) SHT31D temperature—time of day, (e) Si7021—sensor location, and (f) Si7021 temperature—time of day, red color—small distance between objects; blue color—large distance between objects.

Figure 6. Visual Assessment of cluster Tendency for the relative humidity sensors: (a) BME280—sensor location, (b) BME280 relative humidity—time of day, (c) SHT31D sensor location, (d) SHT31D relative humidity—time of day, (e) Si7021—sensor location, and (f) Si7021 relative humidity—time of day, red color—small distance between objects; blue color—large distance between objects.
time of day measurements (Figure 5 and Figure 6). Also, there were some similarities between the full spectrum and infrared light measurements clustering tendencies time of day measurements (Figure 7).

Figure 7. Visual Assessment of cluster Tendency for the light intensity sensors: (a) TSL2591 full spectrum—sensor location, (b) TSL2591 full spectrum light intensity—time of day, (c) TSL2591 infrared light intensity—sensor location, (d) TSL2591 infrared light intensity—time of day, (e) TSL2591 lux light intensity—sensor location, and (f) TSL2591 lux light intensity—time of day, red color—small distance between objects; blue color—large distance between objects.
3.2. Heatmaps
Heatmaps were developed to evaluate the spatial variability for a specific environmental measurement in the greenhouse and to compare outputs of the different sensors. The heatmap rows (sensor locations) and columns (environmental measurements based on time) were grouped based on the hierarchical relationship

Figure 8. Visual Assessment of cluster Tendency for the BME280 barometric pressure sensor: (a) sensor location, (b) barometric pressure—time of day, red color—small distance between objects; blue color—large distance between objects.
Table 3. Hopkins cluster tendency measurements for environmental monitoring sensors located in a greenhouse.
a. Sensor location in the greenhouse (Figure 4), b. Sensor specific measurement clustered on time of measurement.
between sensor location and difference in the environmental parameter measurements, respectively.
The temperature heatmaps are illustrated in Figures 9-11 for the BME280, SHT31D, and Si7021 sensors. The trend between the daytime and the nighttime temperature was evident, resulting in two large temperature zones on the heatmap. The zone on the right in which cell colors appear in blue represented the lower nighttime temperatures occurring for readings T0 - T6 (0000 - 0600 hrs.) and T21 - T23 (2100 - 2300 hrs.). The zone on the left with cell colors ranging from white to red represented the higher daytime temperatures. The maximum temperature differences between day and night were approximately 8˚C. Readings T7 (0700 hrs.) and T21 (2100 hrs.) measured by all sensors appeared to be a

Figure 9. BME280 temperature sensor heatmap clustered on sensor location and temperature readings in the greenhouse. Cells are color coded according to their temperature readings—black number in cells. S—sensor, T—hourly temperature readings. The data were collected in February 2019.

Figure 10. SHT31D temperature sensor heatmap clustered on sensor location and temperature readings in the greenhouse. Cells are color coded according to their temperature readings—black number in cells. S—sensor, T—hourly temperature readings. The data were collected in February 2019.
transitional zone between day and night temperatures. The highest temperatures were recorded for measurements T12 (1200 hrs.) and T17 (1700 hrs.). Sensors 2, 7, 8, and/or 12 (Figure 4 and Figures 9-11) were often clustered together as the warmest region in the greenhouse during those times. Generally, the lowest

Figure 11. Si7021 temperature sensor heatmap clustered on sensor location and temperature readings in the greenhouse. Cells are color coded according to their temperature readings—black number in cells. S—sensor, T—hourly temperature readings. The data were collected in February 2019.

Figure 12. BME280 relative humidity sensor heatmap clustered on sensor location and relative humidity readings in the greenhouse. Cells are color coded according to their relative humidity values—black number in cells. S—sensor, T—hourly relative humidity readings. The data were collected in February 2019.
temperature readings were recorded by S4 (Figure 4 and Figures 9-11).
Figures 12-14 show the heatmaps of relative humidity measurements obtained by the BME280, SHT31D, and Si7021 sensors. The relative humidity val-

Figure 13. SHT31D relative humidity sensor heatmap clustered on sensor location and relative humidity readings in the greenhouse. Cells are color coded according to their relative humidity values—black number in cells. S—sensor, T—hourly relative humidity readings. The data were collected in February 2019.

Figure 14. Si7021 relative humidity sensor heatmap clustered on sensor location and relative humidity readings in the greenhouse. Cells are color coded according to their relative humidity values—black number in cells. S—sensor, T—hourly relative humidity readings. The data were collected in February 2019.
ues ranged from approximately 30% to 60%. The highest values were recorded for readings T0 - T6 (0000 - 0600 hrs.). S4 SHT31D and Si7021 sensors (Figure 4, Figure 13 and Figure 14) and S2 BME280 sensor (Figure 12) recorded the highest relative humidity values. Also, between 0000-0600 hrs. (T0 - T6 readings), S9 for all relative humidity sensors recorded the lowest relative humidity values. Overall, the lowest relative humidity values occurred for 0800 hrs. (T8) and 1200 - 2000 hrs. (T11 - T20) measurements. Column-wise in the relative humidity sensor heatmaps (Figures 12-14), the differences between daytime (orange to red areas) and nighttime (blue colored areas) values were evident for all sensors.
The light intensity sensor results are shown in Figures 15-17. During 1000 - 1400 hrs. (T10 - T14), the highest light intensity values were recorded for all sensors. Overall, the highest light intensity reading for the full spectrum, infrared, and lux sensor was measured for T12 (1200 hrs.), and it was recorded by S3 (Figure 4 and Figures 15-17). Generally, the lowest light intensity readings were observed in the lower right corner of the heatmap. Those values were recorded by S4 and S11 (Figure 4) for measurements obtained at 0700 hrs. (T7), 1800 hrs. (T18), and 1900 hrs. (T19) (Figure 4 and Figures 15-17).
The barometric pressure data had a narrow range (Figure 18). The difference between the minimum and the maximum values was 3 hPa. The maximum values were measured by S9 (Figure 4) for reading T10 (1000 hrs.) and the lowest value was acquired by S3 (Figure 4) for readings T15 - T17 (1500 - 1700 hrs., Figure 18). The general trend was that the highest values were measured during 0900 - 1100 hrs. (T9 - T11) and the lowest values between 1500 - 1700 hrs. (T15 - T17).
4. Discussion
This study demonstrated how open-source and inexpensive equipment could be used to monitor greenhouse environmental conditions over time. Environmental

Figure 15. TSL2591 full spectrum light sensor heatmap clustered on sensor location and light intensity readings in the greenhouse. Cells are color coded according to their full spectrum light intensity values—black number in cells. S—sensor, T—hourly full spectrum light intensity readings. The data were collected in February 2019.

Figure 16. TSL2591 infrared light sensor heatmap clustered on sensor location and infrared light intensity readings in the greenhouse. Cells are color coded according to their infrared light intensity values—black number in cells. S—sensor, T—hourly infrared light intensity readings. The data were collected in February 2019.

Figure 17. TSL2591 lux light sensor heatmap clustered on sensor location and lux light intensity readings in the greenhouse. Cells are color coded according to their lux light intensity values—black number in cells. S—sensor, T—hourly lux light intensity readings. The data were collected in February 2019.
measurements based on time of day appeared to be a better grouping mechanism for analysis than sensor location. The former had more distinct dark boxes in the Visual Assessment of Cluster Tendency analysis (Figures 5-8), and its groupings had lower Hopkins statistic values (Table 3).

Figure 18. BME280 barometric pressure sensor heatmap clustered on sensor location and barometric pressure readings in the greenhouse. Cells are color coded according to their barometric pressure values—black number in cells. S—sensor, T—hourly barometric pressure readings. The data were collected in February 2019.
The highest readings for the temperature (Figures 9-11) and light intensity (Figures 15-17) measurements occurred between 1200 - 1400 hrs. (T12 - T14). Also, during that time, the lowest relative humidity readings were observed (Figures 12-14). Relative humidity and temperature are negatively related. The heatmaps show the negative relationship between the temperature and the relative humidity sensor readings. Also, a relationship between those sensors’ measurements was expected because of the similarities between their time-of-day cluster tendency images (Figure 6 and Figure 7). Refs. [2] [3] noted a negative relationship between relative humidity and temperature readings in their testing of miniature sensors in a greenhouse.
Similarities observed in the variability between the infrared and the full spectrum light intensity sensor were anticipated since the full spectrum sensor measures visible and near infrared data. Furthermore, the highest light intensity values observed at T12 occurred because the measurement was near solar noon, which is when light intensity is at its greatest during the day. The highest values were observed at S2 and S3 (Figure 4 and Figures 16-18), which were located on the east side of the greenhouse adjacent to the polycarbonate wall of the greenhouse. The barometric pressure sensor values range was narrow; therefore, it may not offer useful variability measurements in a greenhouse setting.
Multiple sensors and sensing technologies were used in this study to evaluate differences between the sensors, mainly for measuring temperature and relative humidity. A similar study, or evaluation of any greenhouse or similar structure, could be performed using only a single temperature and humidity sensor to reduce cost and duplicate measurements. Overall, the findings were agreement with other studies supporting the integration of wireless sensor networks and multiple sensor nodes to monitor variability in environmental parameters within a greenhouse [2] [4].
5. Conclusion
An integrated sensor node for simultaneous measurements of temperature, relative humidity, light intensity, and barometric conditions was proposed for monitoring environmental conditions in a greenhouse. Twelve sensor nodes were developed and placed throughout a greenhouse for testing. The results showed that the sensors worked well in collecting the environmental measurements and measuring spatial variations in greenhouse conditions. Sensor measurements indicated that environmental conditions inside a greenhouse can vary considerably throughout the day, as well as across physical locations within the greenhouse. Researchers or other users who assume or require uniform environmental conditions within a greenhouse can verify the uniformity, or measure the variability, of conditions using the relatively low-cost, open-source monitoring system described here.
Acknowledgements
The authors would like to thank Keysha Hamilton for assisting in developing the sensors. Mention of a trade name, proprietary product, or specific equipment does not constitute a guarantee or warranty by the United States Department of Agriculture and does not imply approval of the product to the exclusion of others that may be available.
Conflicts of Interest
The authors declare no conflict of interest regarding the publication of this paper.
Cite this paper
Fletcher, R.S. and Fisher, D.K. (2021) Testing an Open-Source Multi Brand Sensor Node to Monitor Variability of Environmental Conditions inside a Greenhouse. Agricultural Sciences, 12, 159-180. https://doi.org/10.4236/as.2021.123011
References
- 1. Futagawa, M., Iwasaki, T., Murata, H., Ishida, M. and Sawada, K. (2012) A Miniature Integrated Multimodal Sensor for Measuring PH, EC and Temperature for Precision Agriculture. Sensors, 12, 8338-8354. https://doi.org/10.3390/s120608338
- 2. Ahonen, T., Virrankoski, R. and Elmusrati, M. (2008) Greenhouse Monitoring with Wireless Sensor Network. Proceeding of the IEEE/ASME, Beijing, 12-15 October 2008, 403-408. https://doi.org/10.1109/MESA.2008.4735744
- 3. Fletcher, R.S. and Fisher, D.K. (2018) A Miniature Sensor for Measuring Reflectance, Relative Humidity, and Temperature: A Greenhouse Example. Agricultural Sciences, 9, 1516-1527. https://doi.org/10.4236/as.2018.911106
- 4. Ferentinos, K.P., Katsoulas, N., Tzounis, A., Bartzanas, T. and Kittas, C. (2017) Wireless Sensor Networks for Greenhouse Climate and Plant Condition Assessment. Biosystems Engineering, 153, 70-81. https://doi.org/10.1016/j.biosystemseng.2016.11.005
- 5. Fisher, D.K. and Gould, P.J. (2012) Open-Source Hardware Is a Low-Cost Alternative for Scientific Instrumentation and Research. Modern Instrumentation, 1, 8-20. https://doi.org/10.4236/mi.2012.12002
- 6. Fisher, D.K., Fletcher, R.S. and Anapalli, S.S. (2019) Evolving Open-Source Technologies Offer Options for Remote Sensing and Monitoring in Agriculture. Advances in Internet of Things, 10, 1-10. https://doi.org/10.4236/ait.2020.101001
- 7. Senserion (2019) SHT3x-DIS Humidity and Temperature Sensor Datasheet. https://www.sensirion.com/fileadmin/user_upload/customers/sensirion/Dokumente/2_Humidity_Sensors/Datasheets/Sensirion_Humidity_Sensors_SHT3x_Datasheet_digital.pdf
- 8. Silicon Labs (2016) Si7021-A20 I2C Humidity and Temperature Sensor. https://www.silabs.com/documents/public/data-sheets/Si7021-A20.pdf
- 9. Bosch Sensortec (2018) BME280 Digital Humidity, Pressure and Temperature Sensor Datasheet. https://ae-bst.resource.bosch.com/media/_tech/media/datasheets/BST-BME280-DS002.pdf
- 10. AMS (2018) TSL2591 Light-to-Digital Converter. https://ams.com/documents/20143/36005/TSL2591_DS000338_6-00.pdf/090eb50d-bb18-5b45-4938-9b3672f86b80
- 11. Wilson, S. (2020) MiceRanger: Multiple Imputation by Chained Equations with Random Forests. https://CRAN.R-project.org/package=miceRanger
- 12. R Core Team (2020) R: A Language and Environment for Statistical Computing. R Foundation for Statistical Computing, Vienna. https://www.r-project.org
- 13. Wilkinson, L. and Friendly, M. (2009) The History of the Cluster Heat Map. The American Statistician, 63, 179-184. https://doi.org/10.1198/tas.2009.0033
- 14. Bezdek, J.C. and Hathaway, R.J. (2002) VAT: A Tool for Visual Assessment of (Cluster) Tendency. Proceedings of the 2002 International Joint Conference on Neural Networks, Honolulu, 12-17 May 2002, 2225-2230. https://doi.org/10.1109/IJCNN.2002.1007487
- 15. Lüdecke, D., Makowski, D., Ben-Shachar, M.S., Patil, I., Højsgaard, S. and Lau, Z.J. (2020) Parameters: Processing of Model Parameters. https://CRAN.R-project.org/package=parameters
- 16. Kassambara, A. and Mundt, F. (2020) Factoextra: Extract and Visualize the Results of Multivariate Data Analyses. https://CRAN.R-project.org/package=factoextra
- 17. Lüdecke, D., Ben-Shachar, M., Patil, I. and Makowski, D. (2020) Extracting, Computing and Exploring the Parameters of Statistical Models Using R. Journal of Open Source Software, 5, 2445. https://doi.org/10.21105/joss.02445
- 18. Gu, Z., Elis, R. and Schlesner, M. (2016) Complex Heatmaps Reveal Patterns and Correlations in Multidimensional Genomic Data. Bioinformatics, 32, 2847-2849. https://doi.org/10.1093/bioinformatics/btw313