Journal of Modern Physics
Vol.07 No.10(2016), Article ID:67530,12 pages
10.4236/jmp.2016.710103
Monochrome HUD’s Imaging Projector Based on Laser-DMD System
Sayed Sajjad Mousavi Fard*, Masood Kavosh Tehrani, Mehrdad Mehrani
College of Opto-Electronics Engineering, Malek Ashtar University of Technology (MUT), Shahin Shahr, Iran

Copyright © 2016 by authors and Scientific Research Publishing Inc.
This work is licensed under the Creative Commons Attribution International License (CC BY).
http://creativecommons.org/licenses/by/4.0/


Received 9 May 2016; accepted 16 June 2016; published 21 June 2016
ABSTRACT
Design and tolerance of a new head up display’s projector system is reported. It is based on laser-micro display modules. We designed optical diffraction limited modules and some of our novelties were compactness, using common material and spherical lenses in optical design, easy and economical manufacturing process, uniform intensity and minimum aberrations of final image, economical and repairable designed system. Projector magnification is 10.0X and diagonal of image plane is 76.2 mm. ZEMAX software is employed for optical design and tolerance.
Keywords:
Head-Up Display (HUD), Head Mounted Display (HMD), Deformable Micro Mirror Displays (DMD), Polarizer Beam Splitter (PBS)

1. Introduction
One of the most important requirements for the pilot’s cockpit is the type of display through which the most important flight information with the outdoor image is simultaneously provided for the pilot. Two types of display instruments were used: Head-Up Displays or HUDs and Helmet Mounted Displays or HMDs. HUD is a type of display instrument mounted in the cockpit and the most important flight information, the image of outside area, comes in its combiner-collimator beam splitter display surface and thus, a composite image of the outside world with the flight information is available to the pilot. HMD has the same structure, but its main specification is the compactness structure of the projection mounted on the pilot’s helmet building the output image in its exit pupil [1] [2] . In this article, the HUD type has been designed. Creating high quality image is a common concern for optoelectronic designers. The image quality for this system is a function of: light source, image source and image projector’s optical design. Therefore, there are three fundamental challenges that must respond in a favorable method [3] [4] . Historically, four types of light sources have been introduced for these displays; they are: Arc lamps, Halide-metal lamps, LED and Lasers. The laser light source has been used according to its unique features that lead to the quality of the output image. Image source has been a constant concern; indeed, different generations of HUDs are identified by this module. The first-generation of displays is Cathode Ray Tube or CRT that is still used in common HUDs. They had weaknesses that led to the appearance of other generation. The main problems of these types are: low intensity, brightness and contrast, cost limitation, high power consumption, saturated image with time, low operating endurance, cooling problems, phosphor’s erosion and limitation of gray scale. These problems led to its sharp decline in popularity. The second generation of the image source is liquid crystal display or LCD; in an overall classification, this type is divided into two types: transmission and reflection. Reflective type is Liquid Crystal On Silicon platform or LCOS, its benefits are: small dimension, high resolution, more rigid and reliable structure, but its limitations such as polarized light source requirement, less efficiency in comparison to DMD type, temperature control requirement, high intensity light source requirement made it less popular [5] [6] . The third generation is holographic displays that made desired images by reconstruction of the Fourier transforms. Reflective structure made its output more brightness. Its potential limitations should also be noted: first, this type is limited to monochromatic light source, second, its complex structure increases the charges, and third, speckle phenomena decrease the final image quality [7] - [9] . Deformable Micro Mirror Displays or DMD is the fourth generation of the image sources that appeared in 1997 with Texas instrument and was vastly considered by optical systems designers. Its disadvantages are: more complex to drive, higher price compared to other micro displays, limitations in reducing the pixel dimensions, but it offers wide advantages such as high contrast and reflective efficiency, reliable and rigid structure, high operating temperature range, independence on polarized light and lower intensity light source requirement [10] [11] . Its optimum benefits compelled us to apply them in our system. In the final step, there was the most important challenge: “optical design”, it was a challenge because of the following requirements: high compacted projector element, eliminating the aberrations in diffraction limit and making a uniform bright image [12] . In this article, comprehensive reviews of essential elements have been explained and the elements optical design is carried out with “ZEMAX” program based on constraints; and finally, tolerance analysis is made for the feasibility of fabrication [13] . Our designed system’s specifications are: compacted structure, diffractive limited optical design, economic considerations, simplification and high image quality.
2. Principal Modules
The layout of this designed system has been illustrated in Figure 1. As can be seen in this figure, projection system is composed of three main parts: first the light source (marked with 1#), second the image source (marked with 5#), and third adapting and the projection optics (marked with 2-4# and 6# respectively). The light emitted from the laser diode source enters the first beam expander with 1.0mm diameter and exits from it with a diameter of 5.0 mm, then this beam with Gaussian profile is transmitted from diffractive optic element, becomes top hat shaped, then this 5.0 mm top hat profile beam enters the second beam expander and exits from it with a diameter of 7.8 mm and enters a beam splitter cube and is reflected on DMD surface perfectly illuminating it, then the modulated light is reflected again from DMD surface and entersa projector. This module creates a 10X magnified image on its gain type diffuser screen. First and second beam expanders with diffractive elements make an adapting module that converts the 1.0 mm diameter Gaussian beam into 7.8 mm top hat ones. This module makes a fit and uniform beam profile to illuminate the DMD micro display, and this is an important requirement for making a high quality image.
2.1. The Light Source
Light source is a primary component of this system, and the correct choice will facilitate the process of setting up the system. This part is made of a green diode laser with a wavelength of 532 nm, and its output power is 1 watt, which is being control by using a mechanical shutter. The output light intensity is controlled to create different levels of brightness. Dimensions of used laser are 40(W) × 36(H) × 90(L) and its specifications are according to Table 1. Inherent parallel beams of laser light placed in the light cone are faced to the image source thus creating minimal waste and desired thumbnail display clarity.
This light source is reliable, highly durable, with a very limited and narrow wavelength range, and has desired brightness for avionic applications. Its radiation safety measurement at field of view is critical; this will be

Figure 1. Block diagram of DMD based projectors for HUD.
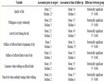
Table 1. Dimensions and performance specifications of used diode laser [14] .
calculated in terms of these parameters: the output light intensity, wavelength range and photo of perception [15] . The bandwidth of this laser and losses caused by intermediate elements (optical or electro optical elements) will cause the final light intensity to become safe. In addition, the light intensity can be adjusted for various applications such as day and night and high or low light outdoor intensity. Laserability to couple with DMD micro display in higher efficiency than other light sources made it an ideal choice to use in our system.
2.2. The Image Source
As mentioned in section one, the selected image source type is DMD, the DMD is fabricated in c-si using similar processing technologies as those applied to integrated circuit fabrication. It consists of an array of mirrors, one per pixel, suspended over CMOS circuitry. Figure 2 shows photographs of the device. In Figure 2(a), the micro mirrors are shown. In Figure 2(b), one of the micro mirrors has been removed to show the underlying structure. Figure 2(c) shows a magnified view of this underlying structure.
The mirror assembly consists of a square mirror on top of a post attached to a torsion-hinge-suspended yoke. The yoke can rotate about ±12˚ (±10˚ in older DMDs) before it contacts the mechanical stop. For this deflection, the torsion effects in the hinges are fully elastic. On the silicon substrate, push-pull address electrodes are connected to the CMOS circuitry. The CMOS electronics in the underlying silicon substrate consists of a six transistor SRAM cell per pixel plus other circuits. With the appropriate bias, the mirrors move in response to the voltages on the address electrodes. In the +12˚ position, light incident onto the mirror will be reflected on to the projection lens, and in the −12˚ position, the light is directed away from the lens input and is internally absorbed. Thus, the light from any position on the mirror array is either present or not present, i.e. the projected intensity is binary. The mirrors can switch positions in about 15 μs, which allows achieving gray scales by time-multiplex- ing the mirror position. Luminance between the full-on and full-off values is obtained by selecting the appropriate on- and off-times. Furthermore, DMD micro display has other benefits: first a reflection structure of micro display caused the surface to become warm later, which can also cause high thermal power.
2.3. The Adapting Optics and Projection
The final part of HUD system design requirement is the optical design. Optical design is divided in to two parts: first; adapting light module, and second: projector module. The first module is used to make a proper illuminating light profile and the second part is used to make a perfect magnified final image.
3. Optical Modules Design
3.1. The Adapting Optics Design
Although the use of laser light is very useful, its output light profile is Gaussian. Since making a uniform image in the whole field of view is a very important consideration, this problem should be eliminated as much as possible.It is possible to design an adapting light module; which is composed of two elements: diffractive optic and beam expander element. Diffractive optic element shown in Figure 3, changes the Gaussian profile of laser light to top hat ones that have a high uniform distribution [17] . This uniform light is necessary to make a fit image in the final surface. Its specifications are according to Table 2.
The second necessary element is beam expander; which consists of two 1:5 and 5:7.8 mm element shown with 2# and 4# markers in Figure 1. The first, 1:5 mm element makes entrance light beam for diffractive element and the second 5:7.8 mm makes entrance light beam for beam splitter type prism. These designs are diffractive limited, and no more aberrations are added to its output according to Figure 4 and Figure 5, respectively.
3.2. The Projector Design
This module is the main optical element in this electro-optical system. As shown in Figure 6. Number 1 element

Figure 2. Photomicrographs of the DMD: (a) 16 μm mirrors on 17 μm centers, with mirrors shown in both the on and off positions; (b) one mirror removed to show underlying structure; and (c) magnified view [16] .
Table 2. Specifications of diffractive beam shaper [17] .

Figure 3. Overall schematic of diffractive beam shaper operation [17] .

Figure 4. MTF diagram of designed beam expander 1:5 mm.
represents the effective area of the used DMD micro display. This element is considered a circle form with a diameter of 7.62 mm to cover up the maximum area of this micro display. Number 2 element represents the beam splitter prism. This prism is made of SF2 material and is considered as a cubic glass with 25.4 mm dimensions. This prism is considered as a transparent cube in optical design. Numbers 3 - 5 and 7 - 11 elements represent spherical lenses.
Number 6 element represents the system’s stop. Nominal stop is the metal diaphragm with 26.0 mm inside

Figure 5. MTF diagram of designed beam expander 5:7.8 mm.

Figure 6. Schematic of 12 elements of designed projector.
diameter that can be changed up to 3.0 mm tolerances to illumination settings. Number 12 optical element is added to correct aberrations for convergence of projection module’s output radiation. The tube length is equivalent to 173 mm that is equal to the distance from the DMD micro display to diffuser display screen, which represents a compact projector system. High compact optical element creates problems in its design. The most important problems are; excessive aberrations, extreme changes in image brightness level and excessive f/#, reduction aberrations techniques, and optimization of these three factors will be presented. The overall features of the designed system are: the length of the projector is equal to 173 mm that is highly desirable and represents a compact system, this module’s optical zoom is 10X, which leads to a 76.2 mm diameter image, it includes 9 spherical lenses. The great benefit of this design compared to other types is its simplicity in manufacturing, assembly, test process and its being more economical. Using a DMD micro display reduces light losses in secondary reflections from its surface, and the image spot diameter created by the projector must be less than 120 μm according to CRT spot diameter. This amount is equal to 15 μm and is approximately 8 times as good as defined value. Important results of our designed module listed in Table 3.
Analysis related to image quality are as follows: the maximum spot diameter of the created image is equal to 15.4 μm according to Figure 7, the distortion aberration amount in the full range of image display is less than five percent and field curvature aberration in the full range of image display is less than 5 mm. According to Figure 8, point spread function for this design is shown in Figure 9. As shown in this figure, an optimized design is carried out.
Figure 10 shows diagrams of relative brightness depending on the height of the beam. As seen the maximum variation in the whole field of view is 5%, which is very desirable. Here is a reminder point: as mentioned later, the gain type diffusers were used to create more uniform illumination in the field of view. Performance of this diffuser image surface is so that the light intensity in the corner is less than other points, and this phenomenon is corrected by an optical design trick. The polymeric elements present interesting abilities as a fit and designed diffuser display surface in a particular field of view is grossly different from the other parts; and therefore, without the excessive brightness from the lighting source, you can easily build a clearer picture in your desired viewing angle.
4. Tolerance Setting on the Designed Projector Module
Since the projector module is the most critical optical module of this imaging system, it is important to put a tolerance on its criteria. We use Monte Carlo analysis, and in this method produce a series of random lenses that fit desired tolerances, and then the index is calculated [18] . Shaded model of this module, after setting tolerances, is shown in Figure 11. The Monte Carlo analysis estimates the real-world performance of a system, which meets the specified tolerances. When performing the Monte Carlo analysis, all tolerances are considered simultaneously. For each Monte Carlo cycle, all of the parameters, which have specified tolerances, are randomly set using the defined range of the parameter and a statistical model of the distribution of that parameter over the specifiedrange. By default, all parameters are assumed to follow the same normal distribution with a total width of fourstandard deviations between the extreme minimum and maximum allowed values. For example, a radius of 100.00 mm with a tolerance of +4.0/−0.0 mm will be assigned a random radius between 100.00 mm and 104.00 mm, with a normal distribution centered on 102.00 mm and a standard deviation of 1.0 mm.
Spot diagram information is according to Figure 12. As seen from this figure, spot diameter variation is negligible, this verified the image quality. Also, distortion and field of curvature aberrations are according to Figure 13, and their changes are negligible too.
Table 3. Important factors in the design of the projector module.

Figure 7. Schematic of spot diameter of image created by this system.

Figure 8. Diagram of distortion aberration and field curvature.

Figure 9. Point spread function of this system.

Figure 10. Schematic of relative illumination in image plan according to the beam height.

Figure 11. Three dimensional image of projector module after making tolerances.

Figure 12. Spot diagram after tolerance.

Figure 13. Field curvature and distortion figures after tolerance.
5. Conclusion
All used optical lenses are spherical, and common materials are utilized in optical design process; therefore, the manufacturing process becomes easy and economical. Making compactness system problems is responded perfectly and the whole of this system will be put in the box with 200 × 200 × 200 mm3 dimensions. As previously mentioned the following factors are important in image quality evaluation [19] : First: created spot diameter, second: uniform intensity on the screen and third: lack of excessive distortion aberration (less than 5% of the total range of the image). Designed system has a high lifetime because of its durable elements and materials, all system components are interchangeable and cost effective.
Cite this paper
Sayed Sajjad Mousavi Fard,Masood Kavosh Tehrani,Mehrdad Mehrani, (2016) Monochrome HUD’s Imaging Projector Based on Laser-DMD System. Journal of Modern Physics,07,1138-1149. doi: 10.4236/jmp.2016.710103
References
- 1. Paul, L. (2008) A Digital Head-Up Display System as Part of an Integrated Autonomous Landing System Concept. SPIE 6957, 695700-10.
- 2. Zhaoa, Q.-L., Wangb, Z.-Q. and Liua, T.-G. (2007) Optik, 118, 29-33.
- 3. Wisely, P. (2008) Enhancing the Performance of a Pilot’s Head-Up Display. SPIE.
- 4. Billings, M., Fernandez, J., Cashen, R., Large, R., Wang, S. and Tisdale, G. (2003) Development of Digital Light Engine Based Head-Up Displays. SPIE 5080, 308-319.
- 5. Brown, R.-D., Modro, D.-H., Quast, G., Wallace, D.-L., Vancleef, M.-G. and Wood, R.-B. (2004) Performance Assessment of a LCOS-Based Head-Up Display. SPIE 5443, 146-155.
- 6. Zhao, Q.-L., Wang, Z.-Q., Guo, H.-Q., Sun, Q., Lu, Z.-W. (2004) Optik, 115, 11-14.
http://dx.doi.org/10.1078/0030-4026-00324 - 7. Buckley, E. (2008) Holographic Laser Projection Technology, Information Display.
- 8. Zheng, H., Yu, Y. and Dai, C. (2009) Optik, 120, 431-436.
- 9. Elmorshidy, A. (2010) Journal of Telecommunications, 2, 104-112.
- 10. Shia, Z. and Gao, Y. (2012) Optik, 123, 1640-1645.
- 11. Bechtela, C., Knobbeb, J., Grügerb, H. and Laknerb, H. (2014) Optik, 125, 876-882.
http://dx.doi.org/10.1016/j.ijleo.2013.07.091 - 12. Hua, H., Ha, Y. and Rolland, J.-P. (2003) Applied Optics, 42, 97-107.
http://dx.doi.org/10.1364/AO.42.000097 - 13. Focus Software ZEMAX Development Corporation (2008) ZEMAX Optical Design Program User’s Guide, Version 10.
- 14. (2013) TOPAG, 532 nm Diode Lasers, Last Modified.
http://www.TOPAG.com - 15. Boyd, R.-W. (1983) Radiometry and the Detection of Optical Radiation. John Wiley and Sons.
- 16. Stupp, E. and Brennesholtz, M. (1999) Projection Displays. Wiley.
- 17. Billings, M. (2003) Development of Digital Light Engine Based Head-Up Displays. SPIE 5080, 308-319.
- 18. Tompkins, K.R. (2000) Projection Displays Technology for Avionics Applications. SPIE 4022, 63-72.
- 19. Christopher, T.-B. (2000) The Flat Panel Head up Display. SPIE 4022, 399-410.
NOTES

*Corresponding author.